Thursday, November 28, 2013

Roasted Butternut Squash Pie with Pineapple Ginger Compote

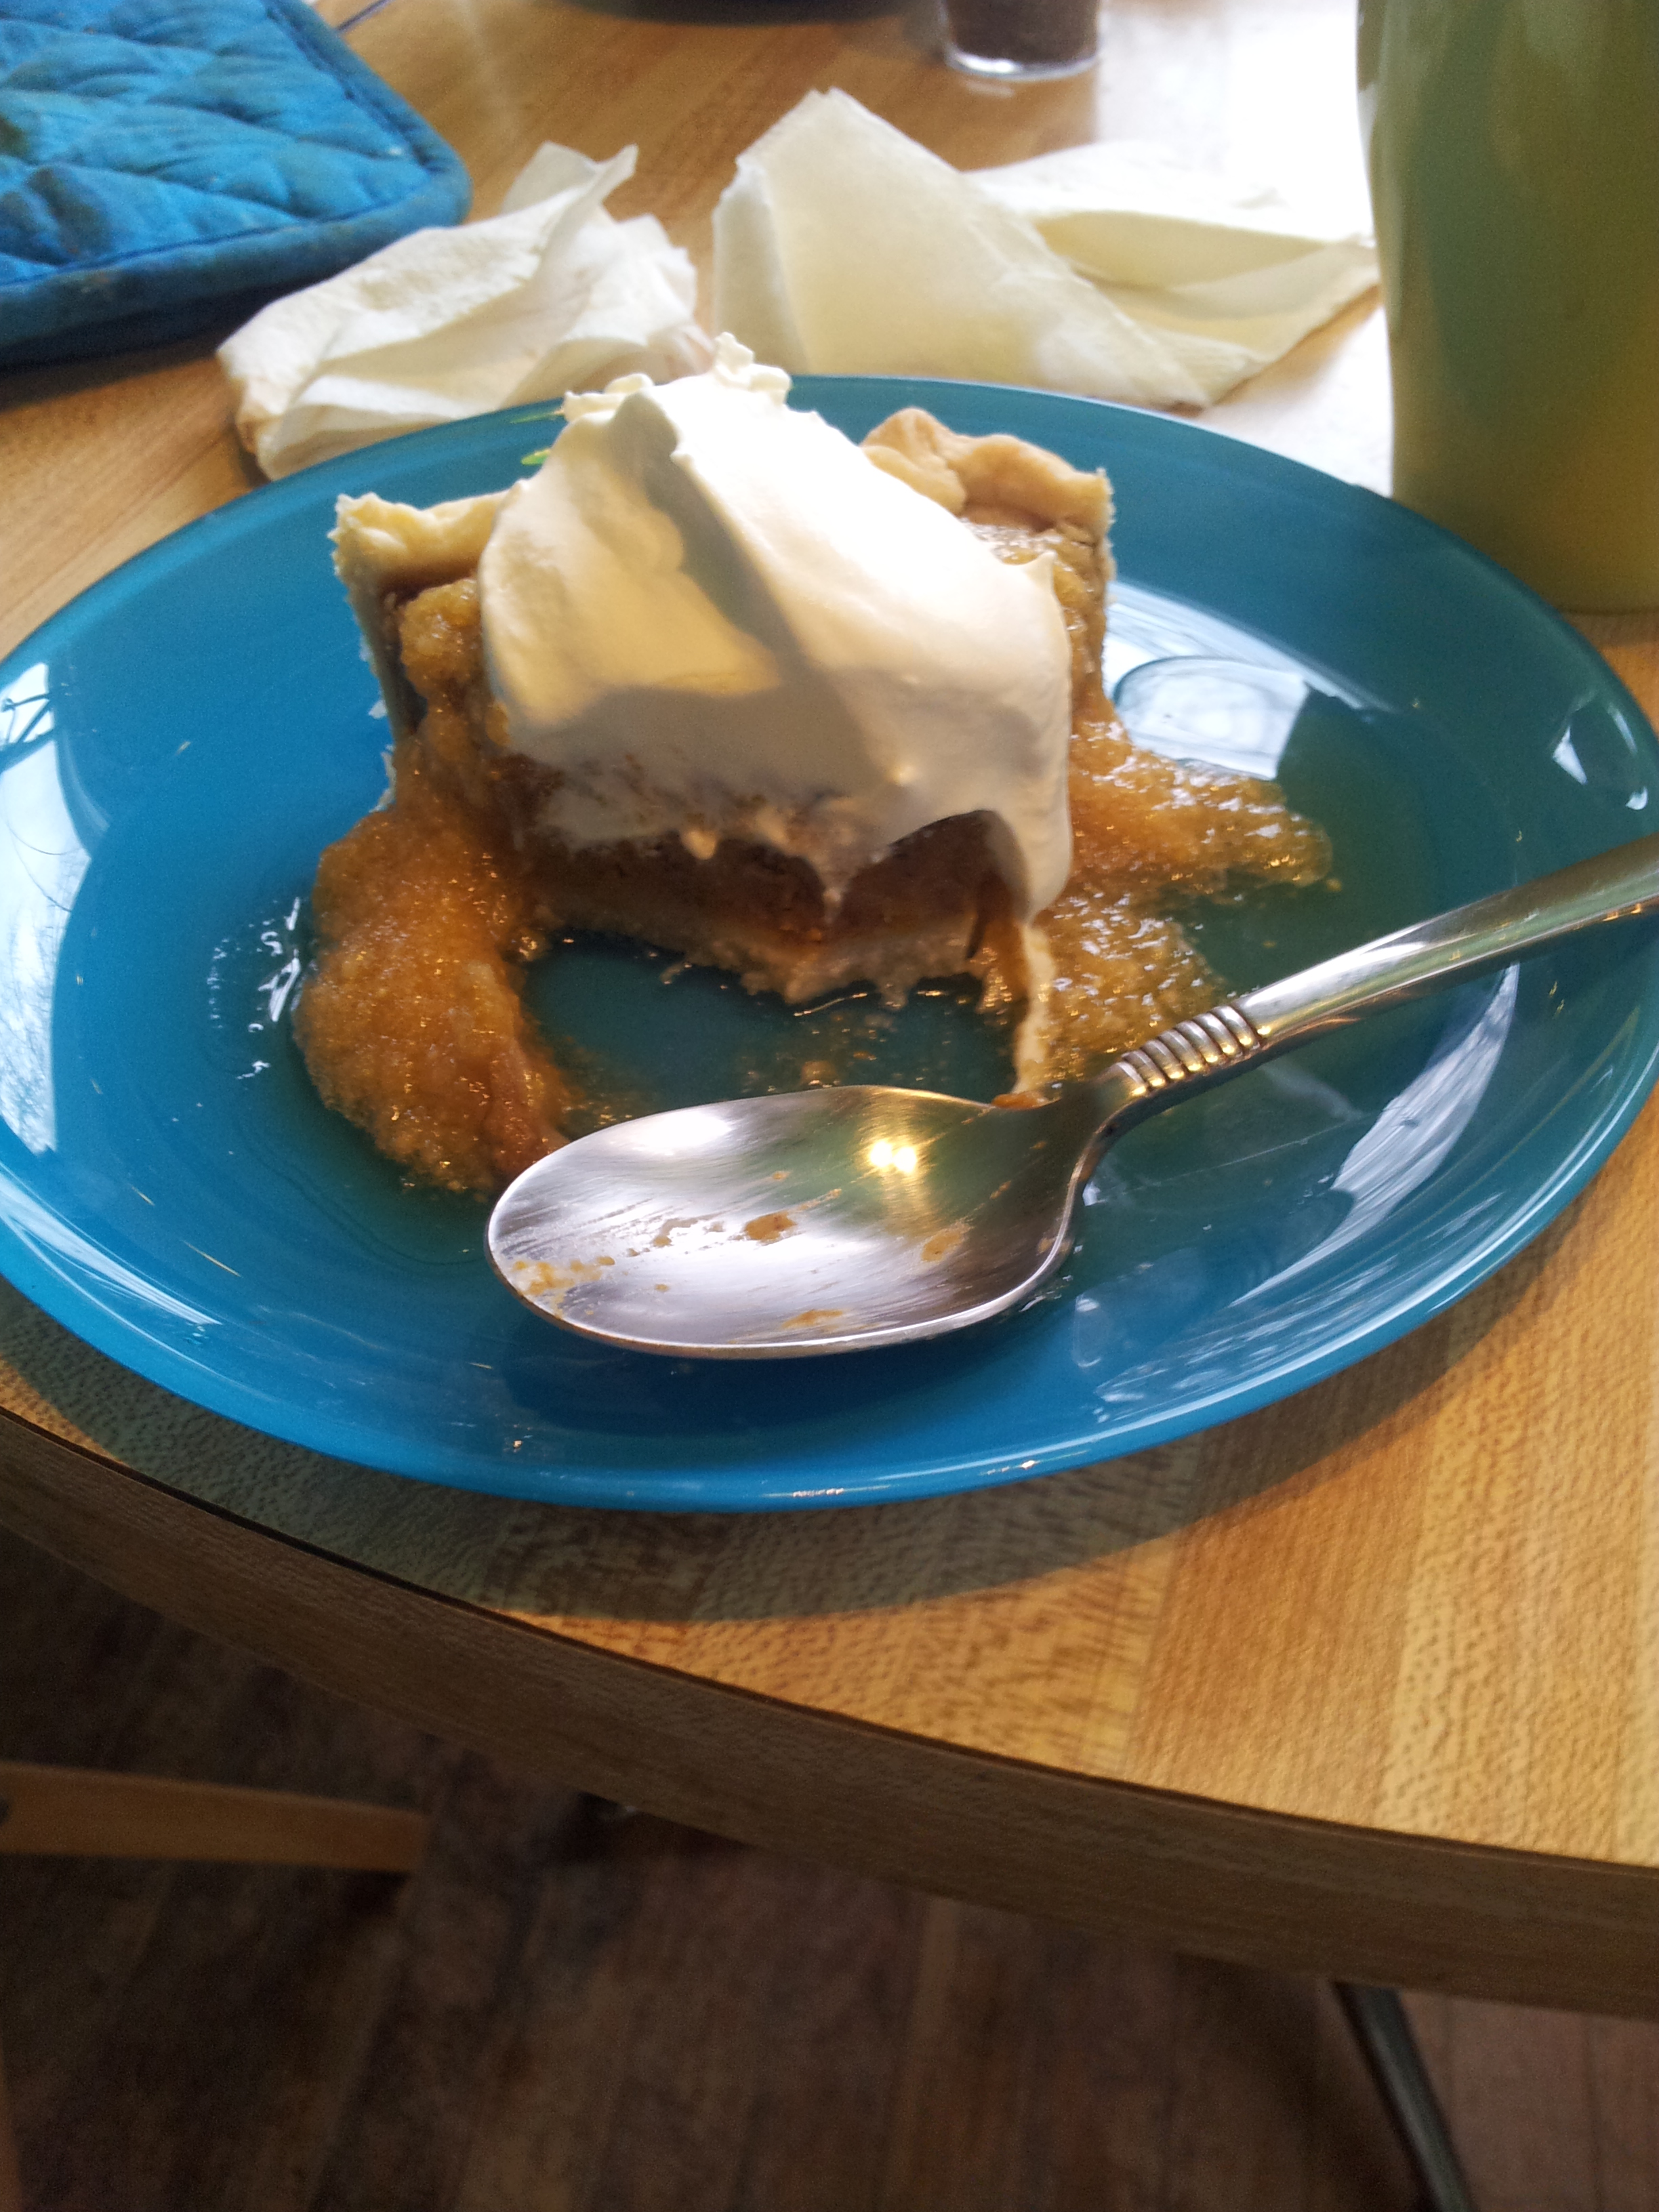
Had several butternut squash on hand for the Thanksgiving holiday and since the last pumpkin I cut up and roasted was so fibrous and stringy, I decided to go with the sweet squash for pie this year. This pie baked up to a deep mahogany brown and was topped by the blond-colored gingered pineapple sauce plus a dollop of sweetened whipped cream. It got raves for flavor and texture all around!
Ingredients:
  •  2 small to medium butternut squash
  • Olive Oil to coat
  • Sea Salt to flavor
  • 3 eggs
  • 1/2 cup heavy cream ( can substitute half and half0
  • 1/2 cup brown sugar
  • 1 teaspoon cinnamon ( I used the Vietnamese kind, much higher in oils)
  • 1/2 teaspoon ground ginger
  • 1/2 teaspoon allspice
  • 1/4 teaspoon cloves
  • Pie crust of your own making or a ready-to-bake crust
Process the squash by cutting a thin slice off tops and bottoms. Use a sharp peeler to remove the skin. Cut the squash in half and remove the seeds from the cavity. Cut into long strips then dice into 1″ pieces. Place on baking sheet and coat with olive oil and a sprinkling of sea salt. Roast in a 400F degree oven for about a half hour or until tender.
Place cooled squash in blender or food processor with the rest of the ingredients for the puree. Process or blend until smooth. Pour into prepared crust and bake 30-40 minutes until set in middle and crust is lightly brown.
Pineapple -Ginger Compote
Ingredients
  • One fresh, ripe pineapple
  • one 1″ piece of fresh gingerroot
  • 1/2 cup apple cider ( could use orange juice to thin as well)
Process pineapple by slicing off top and a thin slice on bottom. Using a large chef’s knife remove the rind all the way around. Slice pineapple in half lengthwise and half each half. Remove cores and dice remainder.Peel ginger and dice finely. Put both in your blender or food processor with the 1/2 cup juice. Process until smooth. The consistency will be like applesauce. Refrigerate.
Cut pie into 6 wedges, top with compote and a dollop of sweetened whipped cream. Enjoy!
Image
Had to take a picture quick before it was gone!

Saturday, October 26, 2013

Making Your Own Gluten-Free Ketchup

Now this isn't the stuff you buy off the supermarket shelves. This is the good stuff. Made from ingredients you can pronounce and can easily obtain. A bit smoky from the roasted peppers and definitely tomato-y from the rich home-grown tomatoes. Your fries or meatloaf will thank you if doused in this yummy tasting sauce.

I'm taking the recipe from Sherri Brooks Vinton's great little book Put 'em Up - a comprehensive home preserving guide for the Creative cook. It is an interesting cookbook chock full of great information about canning, drying and other food preservation methods. I highly recommend that if you've never canned before, get a good reference book like this one to guide you through the steps. It is important to follow recipes when canning so you can get your balance of acidity or sugar right for food safety.


As I said, all the ingredients are easy to obtain and you may have most on the shelves already. It also helps to either grow the produce or get the product fresh when in season from your favorite farmer at the farmers market. We've just had a frost - so up until now, the peppers and tomatoes have been plentiful and very reasonably priced. You really don't make this ketchup to save money, you make it so you can savor the taste.


\


Here's the recipe:

Roasted Pepper Ketchup

Makes about 4 cups

Ingredients:
2 pounds tomatoes
2 pounds red bell peppers ( I used a mix of red and golden)
1 medium onion, chopped
1 cup cider vinegar
1 cup brown sugar
1 tablespoon salt
2 garlic cloves, sliced
1 teaspoon ground allspice
1/2 teaspoon ground cinnamon
1/2 teaspoon ground cloves

Blanch the tomatoes in boiling water and remove to an cold water or iced bath. The skins should come off easily. Roast the peppers and char the skins. After charring put in a paper bag or a bowl with plastic wrap to steam the skins. Remove the skins, seeds and large ribs.


(I know these steps seem like a lot of work and trouble. But I did this in stages. Roasting peppers one day and processing the tomatoes another. Don't feel you have to go on a marathon session doing all these steps.)

Combine the chopped tomato pulp, rough cut peppers, onions, vinegar, brown sugar, salt and spices in a large non-reactive pot and bring to a boil. Reduce the heat after about 10 minutes or when the onions become translucent. Once the ingredients have come together and softened, turn off the heat and puree the mixture with a stick blender or in a couple of batches in a food processor. (I think the stick blender is the neatest tool I have in the kitchen for making sauces, smoothies and soups and highly recommend it!) Be careful because this mixture is hot and can scorch you fast.

Return the puree to the pot and then to the heat and simmer until the mixture reduces to make a thick sauce - could be an hour or two. Remove from the heat.

At this point you can put your sauce in a refrigerator container and put in the fridge for up to 3 weeks, or you can preserve the ketchup in jars by the boiling water bath method. I'm not going to give you a primer here on processing but the time needed to put up these 4 oz. or 1/2 pint jars is 15 minutes and 5 minutes rest period in the hot water. Remove jars to a towel and set aside for 24 hours. Check the seals and then store up to a year.
Monday, July 1, 2013

A Wealth of Blueberries

Went to the Armada Flea Market to sell my plants Sunday and can always get a few bargains on produce. I wound up getting a box of mango to freeze and use for fruit salad on the fourth of July, 4 pounds of very sweet green grapes which I will turn into homemade raisins and a flat of 12 pints of blueberries. Wow! Have my work cut out for me...

Anyway wanted to share my smoothie recipe with you so when you get a load of produce you can make these delicious gluten-free treats. I make them in a cup with my stick blender. I love the stick blender - what a great investment! Instead of getting the food processor out or the blender - it is so easy to whip this thing out and just basically rinse off the detachable stick blade after blending something up. I also use the stick when I am blending sauces in canning season and have used it a lot on vegetable soups that I puree and add a touch of cream to. Neat and highly recommended tool for the kitchen.

Blender and cup that comes with it.


I use all manner of fruit, yogurt, juices and even ice cream or sherbet to make smoothies, depending on the mood of the moment. My standard recipe is about a cup of plain yogurt and some cut up fruit and berries. I make my own yogurt so I guess it would be comparable to regular, not greek yogurt. I'll often add a banana for body and sweetness and some berries. I use a dash, maybe a quarter cup or so of soymilk or regular milk for moisture. Sometimes I'll substitute fruit juice for the milk. Put the stick in and Voila - a minute later you have a great breakfast. Add some whey powder or protein powder for an additional boost to get that extra protein in the morning and if you are really hungry fix a rice cake with some peanut butter with your coffee for a quick breakfast.

Almost 2 cups of a filling smoothie

Lately I've been trying to lose some weight so I have a smoothie for breakfast or for dinner. They really fill me up. So, if you don't yet have a stick blender - get one and you'll thank me since you won't have to wash that big old blender out again.

Next post I'll share what I did with the rest of the berries...my blueberry spread recipe.

Tuesday, June 18, 2013

Strawberry-Rhubarb Crisp

Wow! Was this dessert ever packed with bright color and a tart punch. I made it with regular flour but you could substitute a gluten free flour just as easily. The formula for making a crisp is simple. Clean and dice up fruit, mix with sugar and a couple tablespoons of cornstarch and top with a crumble mix. The proportions can be adjusted for fruit sweetness and how much topping you would like. My recipe went like this:

You will need:
2 cups fresh strawberries
2 cups fresh rhubarb
1 1/4 cups white sugar
1/2 cup brown sugar
1/2 cup flour or gluten free flour
6 tablespoons of butter
1/2 cup chopped pecan pieces
1 cup rolled oats ( I used quick cooking but you could use the steel cut oats, too)

Clean and dice the rhubarb into 1/2 inch pieces. Clean and hull the strawberries, cut in half if large. Add 1 cup white sugar and mix with the fruit. Sprinkle the fruit with 2 tablespoons of cornstarch and mix well. Set aside. Make crumble mix. In a bowl or a food processor. Mix brown sugar, 1/4 cup of the white sugar, flour and oats. Cut in or pulse the cold pieces of butter into the mix. It should resemble large crumbs. Mix in the pecan (or other nut) pieces by hand. Pour fruit into 9x13" pan and top with crumble mix. Bake at 350F for about 35-45 minutes. Enjoy warm with whipped topping or ice cream. Refrigerate leftovers and even have some for breakfast!

Bowl of sugared rhubarb and strawberries
Finished crisp - easy!

Monday, February 18, 2013

Grow a garden

The best foods for a celiac or gluten-free diet are fresh fruits and vegetables. And the best tasting fruits and vegetables are home grown. I've been in and out of the nursery business for the past 25 years and the unfortunate thing about working at a nursery or garden center is that you get burned out by the time you get to your own garden. I was fortunate enough to be able to start a nursery last year and sell my plants at the farmer's markets. The best thing about setting up at the market is that you have immediate access to all the fresh fruits and vegetables that the farmers grow. The veggies stay fresh much longer than supermarket produce I've found. In fact I still have some sugar pumpkins from October sitting in my back utility room! I encourage everyone - if you can't grow your own - visit a farmer at the market - you'll get the freshest and best-tasting food around.

Last year I made my first attempt at canning. I did a simple water-bath method and did tomatoes - sliced, in italian and chili sauce, salsa and a couple of tomato juices - one that is fiery hot! I am proud to say that I have yet to buy a can of tomatoes this winter! I also did a couple of different tasting jams - most notably sweet red pepper and tomato jams plus a couple of fruit jams. I also put by a couple of batches of refrigerator pickles and am due for another batch this week.

The new dehydrator and yogurt machines are getting a workout as well. I make yogurt almost once a week and keep batches for two friends. I dehydrated a lot of stuff from the markets this last year - tomatoes, peaches, grapes - yes they really do make raisins! and I've air dried some herbs to make my own salt combinations in the food processor. I'll do a quick post soon on how to do it it's easy.

If you would like to beautify your new garden and live in the metro Detroit, Michigan area - come see me at the market or make an appointment to see my nursery. I sell perennials, herbs and groundcovers. I'm starting a few vegetable plants as well. My website is Sage Advice Nursery and my blog is at Sage Advice Nursery Blog on blogspot.

As I said in my last post I no longer live on a gluten-free diet, but I do try and limit my intake of wheat products and processed food. I encourage everyone who needs a special diet to grow their own food - it's the best diet God can give.

Tuesday, February 5, 2013

Ham and Bean Soup

I've been absent from this blog for a long while as I found out I no longer have to eat gluten-free. My terrible pain stemmed from some medications I had been taking for the past 15 years and when I went gluten-free I switched medications so it was coincidental. I advocate eating gluten free as I lost weight and felt good but darn it- I craved bread. So I am back to eating regularly - and have gained a bit of weight in the process!

But tonight - since I feel guilty about not checking in here now and again- I made a gluten free Ham and Bean soup. Soaked a bag of beans for about 6-8 hours. Drained them. Chopped one onion, one carrot and a half pound of ham slices. Dearborn ham, mind you, one of the best here in the Detroit area. Dropped them all in the crock pot and added the beans. Put in a tablespoonful of "Better than Bouillon" Vegetable Base and a pitcher of water. Cooked for about 4 hours on high then simmered for another 2-3 hours on low. I was worried that there may be salt in the veg base and might screw up the beans but there isn't and they tenderized beautifully. The base has hydrolyzed soy protein and corn in it but no wheat products, so I think it would be OK for a gluten-free diet. Yum! Had a big bowl of it for dinner and I plan to bring my brother a big batch of it for tomorrow's lunch.

May your gluten-free quest be good. I know mine was hard but it seemed to take away a great deal of the stomach pain I had been having. I think it is good to take a break from wheat now and then so I'll try and check back in here a bit more often. Thanks for stopping by!

Monday, June 22, 2009

What's for Dinner? Chunky Chili!

It's my go to meal when I want a lot of something for leftovers - a big vat o' chili. Mom taught me a version of this recipe which is lifted from the Betty Crocker cookbook. Now, you hard-liner chili buffs, this is with beans and tomatoes and tomato soup. When I first had to eat gluten-free, I was so disappointed that I could no longer use Campbell's tomato soup which uses wheat. In this recipe I substituted Amy's - which is gluten free - but much more expensive.

Cooking a vat like this is much more art than science, so go to town with your own variations...

Basic Chunky Chili Recipe

1 lb ground beef
large onion - diced or minced if you don't like the chunky bits
3 medium tomatoes - diced, can use a can if you like
1T crushed garlic - about a clove
1 15oz can kidney beans - I like the dark red ones
1 can Amy's tomato soup - ready to eat not condensed
dash olive oil
1-3T chili powder to taste
salt


Heat up a big pot - preferably heavy - I use cast iron.
Add some olive oil to the bottom.
Have vegetables diced and prepped.
Toss in onions to lightly carmelize - watch em so they don't burn.
Add ground beef - I usually use chuck - it's got some fat for flavor.
Brown ground beef, add tomatoes, garlic and salt the whole mess to taste which will help the tomatoes break down.
Add can of kidney beans - don't bother to drain unless you are fussy.
Add can of Amy's tomato soup - let simmer about 10 minutes
Add 1-3 tablespoons of chili powder - more or less depending on your taste.
Let simmer at least a half hour. The older it gets - to a point! - the better.

Serve with a dollop of sour cream and enjoy!


.

Monday, June 15, 2009

MMM Cream Cheese and...

I've used it in cheesecake and spread it on ham to roll up for little appetizers, but I feel like I just discovered cream cheese with this new twist. Was wanting to make a BLT, but my gluten-free bread (store-bought) is so heavy and small - hard to layer a couple tomato slices and the requisite several pieces of bacon on it - so I made this BT spread and saved the lettuce in a green salad. Makes a great light dinner when you don't want to heat up the kitchen.

Bacon-Tomato Cream Cheese Spread

8 oz - 1 block cream cheese, softened
8 slices bacon - cooked and crumbled (I used the microwave stuff - fast and easy)
10 or 12 grape tomatoes - quartered
6 or 8 sundried tomatoes (I get the dried kind - very sweet, tangy and chewy)


Mash all of the above together. Serve as a spread on gluten-free crackers, rice cakes or as an open face sandwich on gluten-free bread. Garnish with cherry tomatoes or a bit of arugula for a nutty spicy flavor.

Friday, February 13, 2009

Raisin Nut Oatmeal bars


I tend to whip up these bar creations, especially when I'm craving something bread-like or sweet. It is a basic recipe:
Cream one stick of butter with one cup of sugar (more if you like it sweet)
Add 2 lightly beaten eggs and mix
Add vanilla - I use Cook's vanilla powder
Add some kind of flour about 1-2 cups
In this recipe I used 3/4 c. almond flour, 1/2 c. buckwheat flour and about a 1/2 c tapioca flour
Don't forget to add leavening - something to make it rise - in this recipe I used 1 teaspoon each GF baking powder and baking soda
Add oatmeal (gluten free of course...), nuts, raisins, chocolate chips any dried fruit or nuts you have on hand - if the batter seems stiff - add some applesauce.
I used a 8-11 inch pan - spread the batter thinner for a crispier cookie, thicker for a cake -like creation...
Bake until brown and set in the middle - test it with a toothpick or poke it with a finger to see if the middle springs back.
I baked these for about 20 minutes at 350F.

Try your own variations with what you have on hand. Don't wait to bake until you've got all the right ingredients - you may be pleasantly surprised by the results!

Saturday, January 17, 2009

Pecan Streusel Coffee Cake

This creation makes just the perfect bite for a breakfast treat or an after dinner sweet. The cake is fairly light and not-too crumbly as many gluten-free baked good can be. The only gluten-free ingredient I use that I had to track down is the gluten-free vanilla flavoring, most vanilla is made with alcohol and you can't be sure that the alcohol isn't made from grain. So I splurged and bought a vanilla powder - it substitutes for a regular vanilla at the same rate. Yummy for gluten free eaters and regular folks!
Heat oven to 350F
Ingredients:
For the streusel mix:
1/2 cup brown sugar
2 teaspoons cinnamon
1/4 to 1/2 cup chopped pecans
1/4 cup melted butter


For the cake:
1 cup sugar

1/4 cup softened butter
2 eggs
1 cup gf sour cream - check the label to make sure it doesn't have modified food starch
1 teaspoon gf vanilla flavor - I used Cook's vanilla powder
1 3/4 cups gf flour
1 teaspoon gf baking powder
1 teaspoon baking soda
1/2 teaspoon salt


Here goes:


1. Cream butter and sugar, add eggs and beat well. Incorporate sour cream and vanilla flavoring.
2. Add rest of ingrediens - you can sift them together separately, but I'm way too unfussy for that.
3. Beat until smooth.
4. Pour half of batter into pan. I used a glass pie plate - glass heats well and makes a browner crust. You could use a 8x8 or 9x9 pan. 
5. Top batter with half of streusel mix
6. Cover with rest of batter. Top with remaining streusel mix.
7. Pop into oven until set and browned on top - approximately 45 minutes. You can use a toothpick to check center for doneness. When the toothpick comes out clean - you're there.
8. Cool, cut into wedges and eat and be happy.


Enjoy!

Saturday, November 1, 2008

Autumn Chicken Stew

The picture doesn't do it justice, but this slow-cooker chicken stew was really delicious. Easy, since it uses cooked chicken and great to switch up according to what leftovers you have in the fridge. Here's how I made it:

1-2 cups cubed cooked chicken breast
2 diced and peeled parsnips
2 large chopped and peeled carrots
2 stalks celery
1 cup apple cider
1 cup drinkable white wine
2 cups chicken broth ( more if you need it)
                                                                                    1 cup frozen peas
                                                                                    1/3 cup cornstarch
                                                                                    1/3 cup powdered milk
                                                                                     Water
                                                                                     Salt and pepper to taste
Toss veg and chicken in slowcooker (except peas) pour in wine, cider and chicken broth, cook on low for 4-6 hours, high for 2-3. Check pot to see if you need more chicken broth. When veg are tender add frozen peas. Mix cornstarch, powdered milk and water together to form a slurry and pour into pot. Allow to cook for another 20-30 min or until peas are thawed. Serves about 6 and makes great leftovers!

Wednesday, October 15, 2008

Peanut-butter Bars

As a wheat free newbie I'm constantly drooling over the cookies and treats that are brought to work functions. Well I whipped these up and brought them in and did they disappear fast! In fact this is the last one and I ate all the crumbs!

A gluten free-treat. I suppose you could make these as drop cookies, but I'm lazy and do them in a 9 x 9 greased pan.


Ingredients:
1/2 c. butter
1 c peanut butter
1 c. brown sugar
1 c. white sugar
2 eggs
1 c. gluten-free baking mix
1 c.gluten-free oats (I used Bob's Red Mill)
optional
1/2 c chopped peanuts
1/2 c chopped apricots

Heat oven to 350F. Grease a 9 x 9 pan.
Mix butter, peanut butter and sugars until smooth. Add eggs beat well.
Add flour and oats. Mix.
Fold in peanuts and apricots (or whatever you choose)
Spread in pan. Batter will be thick.
Bake for 30-40 minutes until golden brown and firm to the touch.


Enjoy!

Raspberry-nectarine pie


They just came out of the oven - two juicy pies, deep garnet and golden with a crumble topping. Frost came last night so the last of the fresh local fruits will be disappearing from the farmers market. I used a mix of fresh raspberries and nectarines for this luscious treat. Here's how I did it
Ingredients: makes 2 pies, freeze one for later
Pie Crust:
1 c. brown rice flour
1 c. gluten-free baking mix
6 T butter
6 T margarine
dash salt
1 t. xanthan gum
1 T sugar
1/3 c. cold water

Mix dry ingredients well. Cut in butter and margarine with a pastry cutter or fork. Add water a bit at a time and knead together until the mixture makes a ball. Chill briefly before rolling or patting out into a greased pie tin. Divide into two balls. I just mushed the crust out with my hands and saved the hassle of getting out the rolling pin and cloth. Makes two bottom crusts.

Filling
1 qt raspberries
3 or 4 good-sized ripe nectarines
1/2 c sugar or to taste
4 T. cornstarch

Put raspberries into a bowl sprinkle with 1/4 c sugar and dust with 2 T. cornstarch, do the same to the cut-up nectarines. Let stand for at least a 1/2 hour to macerate the fruit and develop their juices. Evenly divide the two fruits into each pie crust.

Topping:
1/2 c. brown rice flour
1/2 c. sugar
6 T. butter
1/2 c. walnuts

Mix butter in with rest of ingredients until good and crumbly. Divide and sprinkle over pies.

Put pies in a preheated 350F oven and bake until fruit starts to bubble and set - 35-45 minutes.

Allow to cool slightly before slicing or it will run all over the place! Enjoy!

Tuesday, October 14, 2008

A new lifestyle

Arrgh - after 2 years of unrelenting pain, 13 doctors who misdiagnosed me, thousands of dollars in tests.....I found out it was the gluten in my life that was the cause. I started on a gluten-free diet this April and am still learning what I can and can't eat --- and finding out I have to abandon my habits of consuming processed food and change my lifestyle. It's getting easier.
Today my first gluten-free cookbooks came and I am inspired to get into the kitchen. I'm not a chef and I really didn't learn to cook until a few years ago. Watching the food channel, I would say to myself - well, yeah, I can do that! and I began experimenting in the kitchen. However my recipes are not usually written down, so I am endeavoring to - on this site to capture my successes and share my failures.